
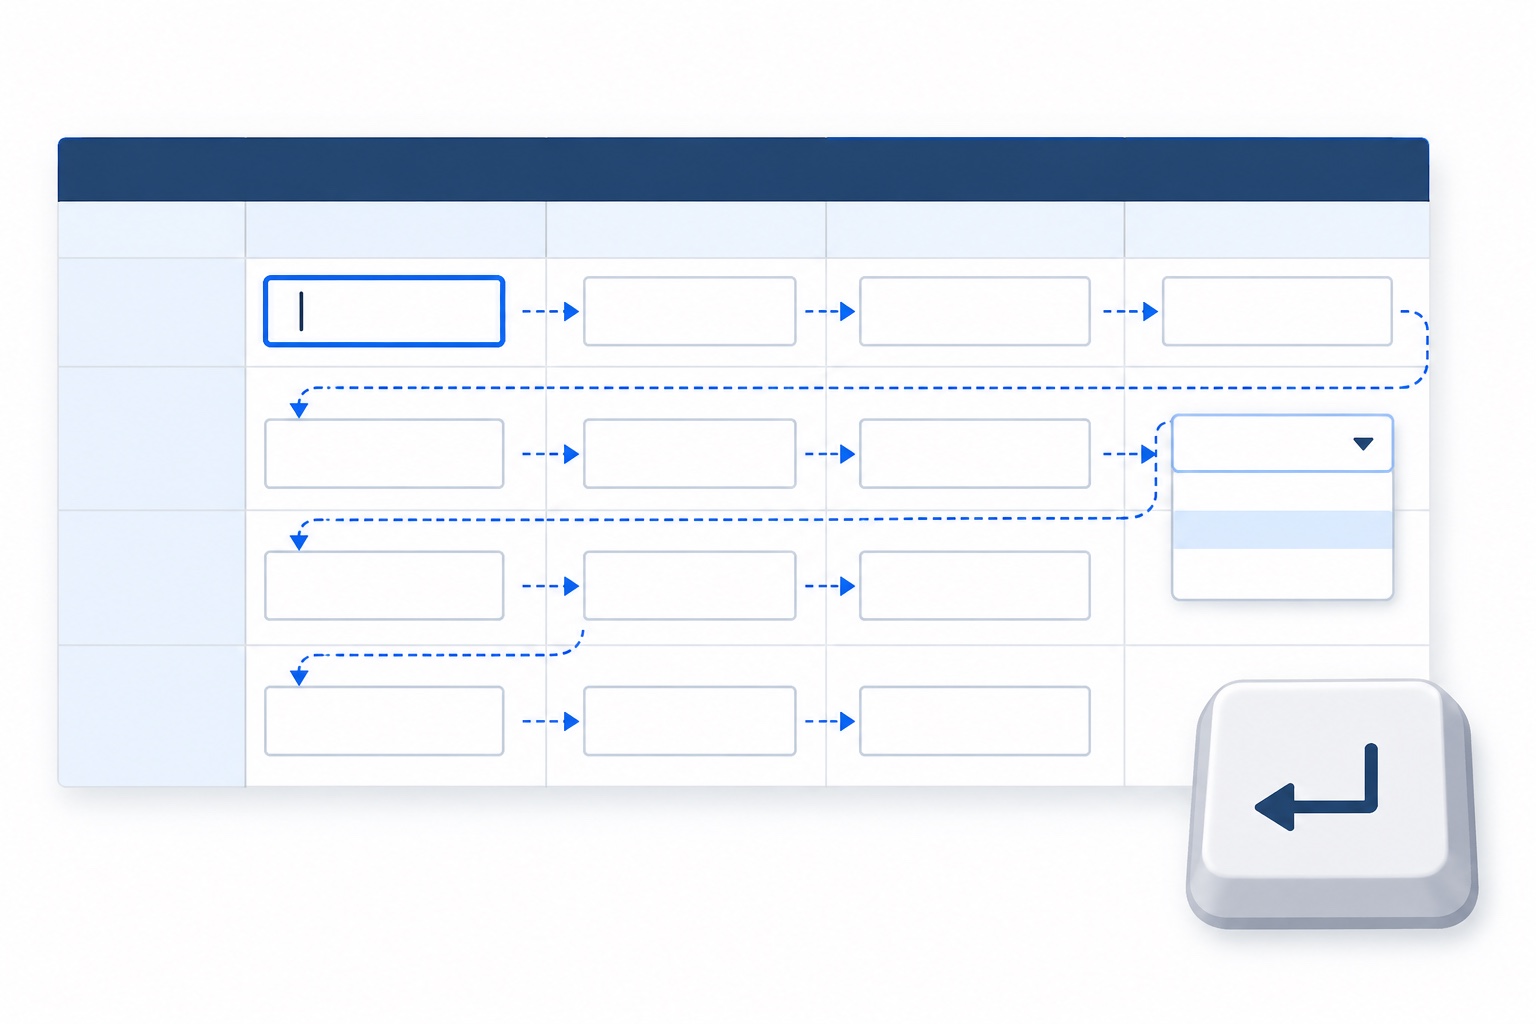
Put an Excel-style form in front of someone who types for a living and watch what happens. They click the first box and nothing happens, because a spreadsheet wants a double-click. They type a name, press Enter, and land on the label underneath. They press Tab and the cursor walks into a protected cell. Somewhere along the way they drag a column border by accident, and now the form is 40 pixels narrower than the printout it was built to match.
None of that is a bug. It’s a spreadsheet doing what spreadsheets do. The trouble is that a lot of business “spreadsheets” aren’t spreadsheets at all — they’re forms with a grid underneath, and the people filling them in want form behaviour.
ReoGrid Web v1.6 added a set of worksheet switches for exactly that shape. This article builds a complete expense-claim form with them, then covers the parts the short introduction in the release notes doesn’t: what the tab order actually does, how to write your own, and how to get the values back out — including the date that comes back as a number.
Form mode works in both editions, the free Lite tier included. The worked example imports
@reogrid/probecause it also writes validation rules and aSUMformula from code; the tier section shows the Lite route to the same form.
What form mode changes
Four worksheet settings and one per-cell hint, each fixing one of the frictions above:
| Setting | Spreadsheet default | In form mode |
|---|---|---|
ws.clickToEdit = true | Double-click to edit | One click opens the editor, caret at the end; I-beam cursor over input cells |
ws.formNavigation = true | Enter moves down, Tab moves right | Enter / Tab go to the next input cell and open it for typing |
ws.layoutLocked = true | Headers can be dragged, double-clicked, reordered | Column widths and row heights stay as designed |
ws.setCellPlaceholder(r, c, text) | An empty cell is just empty | Muted hint text until the user types |
ws.setFormNavigator(fn) | — | Replaces the built-in field order with your own |
What counts as an “input cell” isn’t a new concept. It’s the one sheet protection already has: with ws.protected = true, every cell is locked unless you unlock it, and the unlocked cells are the form’s fields. You mark them once and every other part of form mode follows from it.
Worked example: an expense claim
A header block with two fields per row, a five-line table of expenses, a total, and a notes box. The complete build:
import { createReogrid } from '@reogrid/pro';

const grid = createReogrid({ workspace: '#grid', licenseKey: 'YOUR_LICENSE_KEY' });
const ws = grid.worksheet;

ws.suspendRender();
ws.setGridSize(16, 6);        // A..F — a form doesn't need the default 40 rows
ws.showGridLines = false;     // borders only where the form draws them

// ── Layout ──────────────────────────────────────────────────────────────
[16, 100, 130, 220, 120, 16].forEach((w, c) => ws.column(c).setWidth(w));

const label = { backgroundColor: '#f1f5f9' } as const;
const head = { bold: true, backgroundColor: '#1e3a5f', color: '#ffffff', textAlign: 'center' } as const;

ws.range('B2:E2').merge();
ws.cell('B2').setValue('Expense Claim').setStyle({ ...head, fontSize: 14, verticalAlign: 'middle' });
ws.row(1).setHeight(34);

ws.cell('B4').setValue('Name').setStyle(label);
ws.cell('D4').setValue('Department').setStyle(label);
ws.cell('B5').setValue('Claim date').setStyle(label);
ws.cell('D5').setValue('Project code').setStyle(label);

['Date', 'Category', 'Description', 'Amount'].forEach((h, i) =>
  ws.cell(6, 1 + i).setValue(h).setStyle(head));

ws.cell('D13').setValue('Total').setStyle({ ...label, bold: true, textAlign: 'right' });
ws.cell('E13').setValue('=SUM(E8:E12)').setStyle({ bold: true });
ws.range('E8:E13').setFormat('#,##0.00');

ws.cell('B15').setValue('Notes').setStyle(label);
ws.range('C15:E15').merge();

for (const block of ['B4:E5', 'B7:E13', 'B15:E15']) {
  ws.range(block).border({ style: 'solid', color: '#94a3b8' });
}
ws.resumeRender();

// ── 1. Protect the sheet, then unlock only the fields ───────────────────
ws.protected = true;
for (const field of ['C4', 'E4', 'C5', 'E5', 'B8:E12', 'C15:E15']) {
  ws.range(field).setLock('unlocked');
}

// ── 2. Form behaviour ───────────────────────────────────────────────────
ws.layoutLocked = true;       // the user can't resize or reorder anything
ws.clickToEdit = true;        // a single click starts typing
ws.formNavigation = true;     // Enter / Tab walk the fields

// ── 3. Hints — (row, column) are 0-based, so (3, 2) is C4 ───────────────
ws.setCellPlaceholder(3, 2, 'e.g. Jordan Blake');
ws.setCellPlaceholder(4, 2, 'YYYY-MM-DD');
ws.setCellPlaceholder(4, 4, 'e.g. PRJ-204');
ws.setCellPlaceholder(7, 1, 'YYYY-MM-DD');
ws.setCellPlaceholder(7, 3, 'What was it for?');
ws.setCellPlaceholder(14, 2, 'Optional');

// ── 4. Rules — two dropdowns, real dates, positive amounts ──────────────
ws.range('E4').setValidation({
  type: 'list', options: ['Sales', 'Engineering', 'Support', 'Admin'],
});
ws.range('C8:C12').setValidation({
  type: 'list', options: ['Travel', 'Meals', 'Lodging', 'Supplies', 'Other'],
});
for (const dates of ['C5', 'B8:B12']) {
  ws.range(dates).setValidation({
    type: 'date', operator: 'lessThanOrEqual', value1: '=TODAY()',
    errorMessage: 'Enter a date, no later than today.',
  });
}
ws.range('E8:E12').setValidation({
  type: 'decimal', operator: 'greaterThan', value1: 0,
  errorMessage: 'Amount must be a positive number.',
});

// Start on the first field, ready to type.
ws.selection.moveTo('C4');
grid.focus();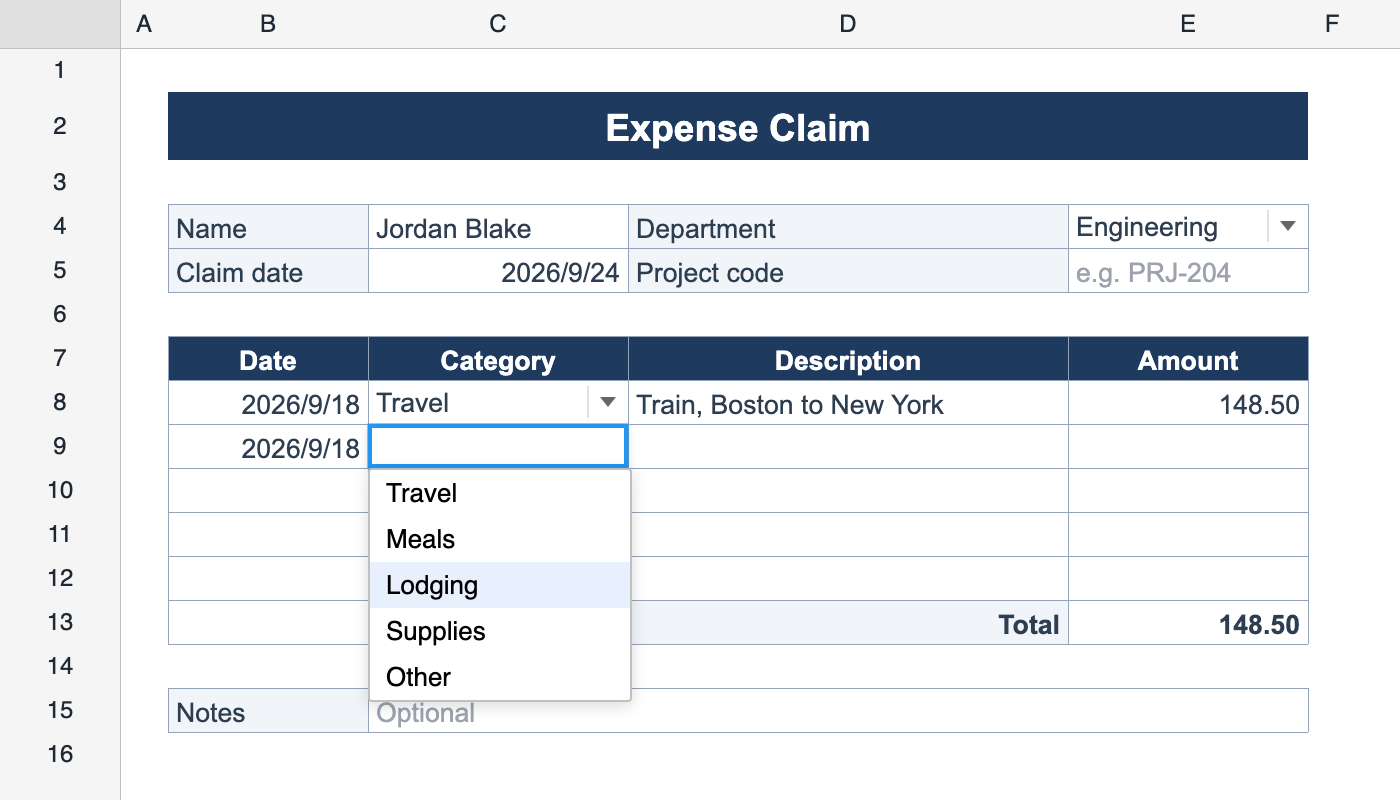
The image above was produced without a single mouse click. Starting on C4: type a name, Enter. The cursor is now in Department, a list field — ↓ opens the list, ↓ again, Enter picks Engineering and moves on. Type the claim date, Enter. Project code is optional, so Enter on the empty box just skips it. Then the first expense line, left to right, and on to the next line.
The rest of this article is what each piece is doing.
The fields are the unlocked cells
ws.protected = true;
ws.range('B8:E12').setLock('unlocked');
This is the only place the form’s fields are declared. Protection stops the user typing into labels, the header row and the Total formula. Form navigation reads the same lock state to decide where Enter goes next. So does clickToEdit — a click on a protected cell still just selects it.
Two ranges deserve a second look:
B8:E12unlocks a whole block. Every cell in it becomes a field, in reading order.C15:E15is a merged cell. A merged block is one stop, at its top-left anchor, so the Notes box is one field rather than three.
Protection also guards the content, but it doesn’t guard the geometry. That’s what the next switch is for.
layoutLocked — the form stays the shape you drew
ws.layoutLocked = true;One flag turns off every way a user can reshape the sheet by accident: header drag-resize of column widths and row heights, the resize cursor that invites it, double-click auto-fit, and whole-row and whole-column drag reordering.
It only blocks the user. Sizing from the API still applies, so your own template code, a responsive-width recalculation, or a “wide mode” button all keep working:
ws.column(3).width = 280; // still applies with layoutLocked onIf the form is also printed or exported to PDF, this is what keeps the screen and the paper in agreement. See the PDF invoice article for the export side.
clickToEdit — one click to type
ws.clickToEdit = true;A plain left click on an editable cell opens the editor immediately, with the caret at the end of any existing text, which is where you want it for correcting a typo. The pointer turns into an I-beam over input cells and stays the normal pointer over protected ones, so you can see where the fields are before you click.
A few things are deliberately left alone. Protected cells don’t open. Drags and modifier-clicks still select ranges. Cell types that replace the text, a checkbox for example, keep their own click behaviour, so a tick box toggles instead of opening an editor.
formNavigation — Enter and Tab walk the fields
ws.formNavigation = true;While a field is being edited, Enter and Tab commit it, jump to the next input cell, and open the editor there with the existing text selected. That way the next field can be typed straight over. Shift reverses the direction.
The built-in order is a reading-order scan over editable cells. For the expense claim, that gives:
C4 → E4 → C5 → E5 → B8 → C8 → D8 → E8 → B9 → … → E12 → C15The scan behaves the way you’d hope:
- it skips protected cells, so the
Departmentlabel between C4 and E4 is never a stop; - it wraps at the end of a row, so the last field of one row continues into the first field of the next — that is what carries you from E4 down to C5, and from each line’s Amount to the next line’s Date;
- it skips hidden rows and columns, so hiding an optional section closes the tab order over it;
- it treats a merged block as one stop, at its anchor — the Notes box;
- at the end of the form, Enter commits and stays put. There is no wrap back to the top.
Two interactions with other features are worth knowing:
Validation gets the first word. Enter commits before it moves. If a stop rule rejects the value, say -50 in an Amount cell, the error bubble shows, the editor stays open on that cell, and navigation doesn’t advance. Bad values can’t be skipped past. See the data validation article for the rules themselves.
Navigation only applies while editing. On a cell that’s merely selected, Enter opens the editor rather than moving. That matters when your code puts the selection on a field — the user can just start typing.
The IME keeps its Enter. For Japanese, Chinese or Korean input, the Enter that confirms a conversion belongs to the IME and doesn’t move anything. The next Enter commits the field and moves on, so typing 山田太郎 into a name field takes two presses, not one.
Placeholders — hints that are never data
ws.setCellPlaceholder(4, 2, 'YYYY-MM-DD');A placeholder is drawn in muted text while the cell is empty and disappears the moment the user types, like an HTML input’s placeholder attribute. You could fake one with a grey cell value, but a fake would be submitted, printed and exported. A real placeholder is render-only:
- it is never part of the cell value:
ws.cell('C5').valueis''while the hint shows; - it never appears in PDF, print, xlsx or JSON;
- it is never right-aligned as a number, and never spills into the neighbouring cell;
- it moves with the cell when rows or columns are inserted or deleted, the same way comments do.
The rest of the API is small:
ws.getCellPlaceholder(4, 2);        // 'YYYY-MM-DD' | null
ws.getCellPlaceholderEntries();     // [{ row, column, text }, …]
ws.setCellPlaceholder(4, 2, '');    // remove one
ws.clearCellPlaceholders();         // remove all
One design note from the example: there are no placeholders on the two list fields. A list field already marks itself with its dropdown arrow, and a hint competing with the arrow is just noise.
Dropdowns from the keyboard
A form that needs the mouse for one field isn’t keyboard-first. So list-validation dropdowns can now be driven entirely from the keys:
| Key | Where | Action |
|---|---|---|
| ↓ | While editing a list field | Open the dropdown |
| Alt+↓ | With the list field selected | Open the dropdown (Excel’s own shortcut) |
| ↑ / ↓ | List open | Move through the options |
| Enter / Tab | List open | Pick the highlighted option |
| Escape | List open | Close without choosing |
The list opens at the cell’s current value, or at the first option if the cell is empty. Picking a Category is usually ↓ ↓ Enter.
In a form, you usually arrive at a list field with the editor already open, so ↓ is the key you’ll use. A list opened that way commits its pick through the editor, exactly as if the option had been typed and Enter pressed. The value passes through validation, and form navigation moves you to the next field. In the example, choosing Travel in C8 lands you in D8, ready to type the description. Alt+↓ on a cell that is only selected behaves as it does in Excel: it writes the pick and leaves the selection where it is.
Your own tab order
The reading-order scan is right for most forms, and wrong for a few. Maybe a two-column layout should be filled down the left column first. Maybe a table of lines has more rows than most people need. setFormNavigator replaces the scan with a function you write:
type Cell = { row: number; column: number };
const at = (row: number, column: number): Cell => ({ row, column });

// The fields in order: header, the lines row by row, then Notes.
const ORDER: Cell[] = [at(3, 2), at(3, 4), at(4, 2), at(4, 4)];     // C4 E4 C5 E5
for (let r = 7; r <= 11; r++) {
  for (let c = 1; c <= 4; c++) ORDER.push(at(r, c));               // B8:E12
}
const NOTES = at(14, 2);                                            // C15
ORDER.push(NOTES);

const LINE_ROWS = { first: 7, last: 11 };

ws.setFormNavigator((from, direction) => {
  // Enter on an empty Date = "no more lines": jump straight to Notes.
  const onLineDate =
    from.column === 1 && from.row >= LINE_ROWS.first && from.row <= LINE_ROWS.last;
  if (direction === 1 && onLineDate && ws.cell(from.row, 1).value === '') {
    return NOTES;
  }
  const i = ORDER.findIndex((f) => f.row === from.row && f.column === from.column);
  return ORDER[i + direction] ?? null;    // null = stop here
});
The navigator receives the cell that was just committed and the direction (1 forward, -1 back), and returns the cell to open next, or null to commit and stay put. Because it runs after the commit, it can look at what the user just entered, and that’s what the “blank Date ends the table” rule does. Someone with two receipts presses Enter on the third line’s empty Date and goes straight to Notes instead of tabbing through twelve empty cells.
Two things to know when writing one:
- Installing a navigator replaces the scan completely. Its order is the only order, which is why
ORDERlists every field, not just the exceptions. Passnullto go back to the built-in scan:ws.setFormNavigator(null). - Don’t call
ws.nextInputCell()from inside the navigator. That method asks “where would Enter go from here?”, and when a navigator is installed, the answer comes from your navigator. Calling it from inside is infinite recursion.
From outside, nextInputCell is useful for exactly that question, for example to show a “Next: Department” hint:
ws.nextInputCell(3, 2, 1); // → { row: 3, column: 4 } — E4, or null at the endReading the form back
The form is filled in; now the app wants an object. Every field is a cell, so reading it is a loop over cell values, with two things to watch.
const text = (a1: string) => ws.cell(a1).value.trim();

// Dates arrive as Excel serial numbers — see below.
const isoDate = (a1: string) => {
  const serial = Number(text(a1));
  if (!text(a1) || !Number.isFinite(serial)) return text(a1);
  return new Date(Date.UTC(1899, 11, 30) + serial * 86_400_000).toISOString().slice(0, 10);
};

function readClaim() {
  const lines = [];
  for (let r = 8; r <= 12; r++) {
    if (!text(`B${r}`) && !text(`D${r}`) && !text(`E${r}`)) continue;   // unused line
    lines.push({
      date: isoDate(`B${r}`),
      category: text(`C${r}`),
      description: text(`D${r}`),
      amount: Number(text(`E${r}`)),
    });
  }
  return {
    name: text('C4'),
    department: text('E4'),
    claimDate: isoDate('C5'),
    projectCode: text('E5'),
    lines,
    notes: text('C15'),
  };
}
Dates come back as numbers. When a user types 2026-09-18 into a cell with no number format, the grid does what Excel does: it stores the date serial 46283 and applies a date format so the cell displays as a date. cell.value returns the stored input, the serial, and isoDate turns it back into a string. If this looks familiar, it’s the same value that shows up when you paste dates from Excel. The date validation rule on those cells is what makes the conversion safe: anything that isn’t a date never gets in.
Required fields are the host’s job. Validation rules check what is typed. By default they let an empty cell through (ignoreBlank: true), because a rule on a column shouldn’t fight half-filled rows. “Name must not be empty” is a submit-time check, and the useful response is to put the user back on the empty field:
const REQUIRED = ['C4', 'E4', 'C5'];

submitButton.addEventListener('click', () => {
  const missing = REQUIRED.find((a1) => text(a1) === '');
  if (missing) {
    ws.selection.moveTo(missing);   // back to the empty field…
    grid.focus();                   // …with the keyboard in the grid: just type
    return;
  }
  void fetch('/api/expense-claims', { method: 'POST', body: JSON.stringify(readClaim()) });
});
grid.focus() is the important half. Clicking the Submit button moved keyboard focus to the button, and without handing it back, the user’s next keystrokes go nowhere.
Not persisted: re-apply after a load
The three switches (layoutLocked, clickToEdit, formNavigation), the navigator and every placeholder are screen state. None of them is written to xlsx or ReoGrid JSON. A load doesn’t treat them all alike, either: loadJson() and reset() wipe the placeholders along with the cell contents, but the switches and the navigator stay on the worksheet object with whatever values they had. So a reload in the same page can come back with Enter still walking fields and no hints in sight, while a fresh page load starts with none of it.
Rather than tracking which part survived, keep the whole set in one function and run it after every load. Running it twice does no harm:
function applyFormMode(ws: typeof grid.worksheet) {
  ws.layoutLocked = true;
  ws.clickToEdit = true;
  ws.formNavigation = true;
  ws.setCellPlaceholder(3, 2, 'e.g. Jordan Blake');
  ws.setCellPlaceholder(4, 2, 'YYYY-MM-DD');
  // …the other hints, and setFormNavigator() if you use one
}
Saving a half-finished claim and restoring it later then looks like this:
const draft = grid.toJson();       // values, styles, rules, protection, unlocked cells
// …later
grid.loadJson(draft);
applyFormMode(grid.worksheet);     // …but not the hints and switches: re-apply
ReoGrid JSON carries the protection flag, the unlocked cells and the validation rules, so the fields survive the round trip and only the behaviour needs re-applying. Read grid.worksheet again after the load rather than holding on to the old reference: a multi-sheet document restores its own active sheet, which may not be the one you were holding.
Where Lite ends and Pro begins
Form mode itself is free. The Pro dependency in the worked example comes from two lines that have nothing to do with it:
| Feature | Lite (free) | Pro |
|---|---|---|
layoutLocked, clickToEdit, formNavigation, setFormNavigator | ✅ | ✅ |
Placeholders (setCellPlaceholder & co.) | ✅ | ✅ |
Sheet protection and unlocked cells (protected, setLock) | ✅ | ✅ |
| Keyboard dropdowns (↓ / Alt+↓) on list rules | ✅ | ✅ |
| Enforcing validation rules loaded from xlsx or JSON | ✅ | ✅ |
Authoring validation rules in code (setValidation) | — | ✅ |
Built-in functions (SUM in the Total cell) | — | ✅ |
xlsx export (saveAsXlsx) | — | ✅ |
That leaves a clean Lite route to the same form: design it in Excel. Lay it out, add the dropdowns and date rules under Data → Data Validation, save the xlsx, and let ReoGrid Web Lite do the rest:
import { createReogrid } from '@reogrid/lite';

const grid = createReogrid('#grid');
await grid.loadFromUrl('/templates/expense-claim.xlsx');

const ws = grid.worksheet;
ws.protected = true;                // xlsx sheet protection isn't imported,
for (const field of ['C4', 'E4', 'C5', 'E5', 'B8:E12', 'C15:E15']) {
  ws.range(field).setLock('unlocked');    // so mark the fields in code
}
applyFormMode(ws);
The validation rules come across with the file and are enforced in Lite, dropdowns and keyboard picks included. Two caveats. Sheet protection and cell lock state are not read from xlsx, so the fields are declared in code as above. And Lite evaluates arithmetic but has no named functions, so the template’s total should be written as =E8+E9+E10+E11+E12 rather than =SUM(E8:E12). A form this size also sits comfortably inside Lite’s 100 rows × 26 columns.
Wrapping up
A spreadsheet becomes a form once it stops behaving like a spreadsheet in the places a form-filler notices. Protection decides which cells are fields. layoutLocked keeps the geometry fixed, clickToEdit opens a field on one click, and formNavigation carries Enter and Tab from field to field, with validation able to stop it. Placeholders show the expected format without ever becoming data, and list dropdowns open from the keyboard so no field needs the mouse. When the reading order isn’t the right order, setFormNavigator takes over.
Try it in the form mode demo. Its toolbar flips each switch so you can feel the difference. The full API is in the form mode docs. For the rules that keep bad values out of the fields, see the data validation article; for turning a filled-in form into a PDF, the PDF invoice article.